把 TaskHub 跑起来:选择工具与开始
上一节我们已经把目标定下来了:接下来的课程不靠一堆互不相干的小例子推进,而是持续搭建一个任务管理后端 TaskHub。现在还没有任务表、业务规则和登录功能,这很正常。写后端的第一步不是急着把目录分成十几层,而是先建立一条最短、最可靠的反馈链路:代码能编译,应用能启动,请求能抵达,响应能回来。
很多人的 Spring Boot 第一次失败,不是因为 Java 代码太难,而是因为工具的边界没分清。明明是 JDK 版本不对,却反复重装 IDE;明明是 Maven 下载依赖失败,却去修改控制器;看到浏览器里的 404,又以为 Spring Boot 根本没启动。几个问题混在一起以后,搭环境就会变成没有方向的试错。
所以这一节不会写成一张冗长的安装清单。我们先弄清楚每个工具负责什么,再用同一套版本生成 TaskHub,读懂生成出来的项目,启动它,最后增加一个最小接口。完成这些动作之后,你手里会有一个真实可运行的后端起点,后面每一节都在它上面加能力。
先把工具的边界分清楚
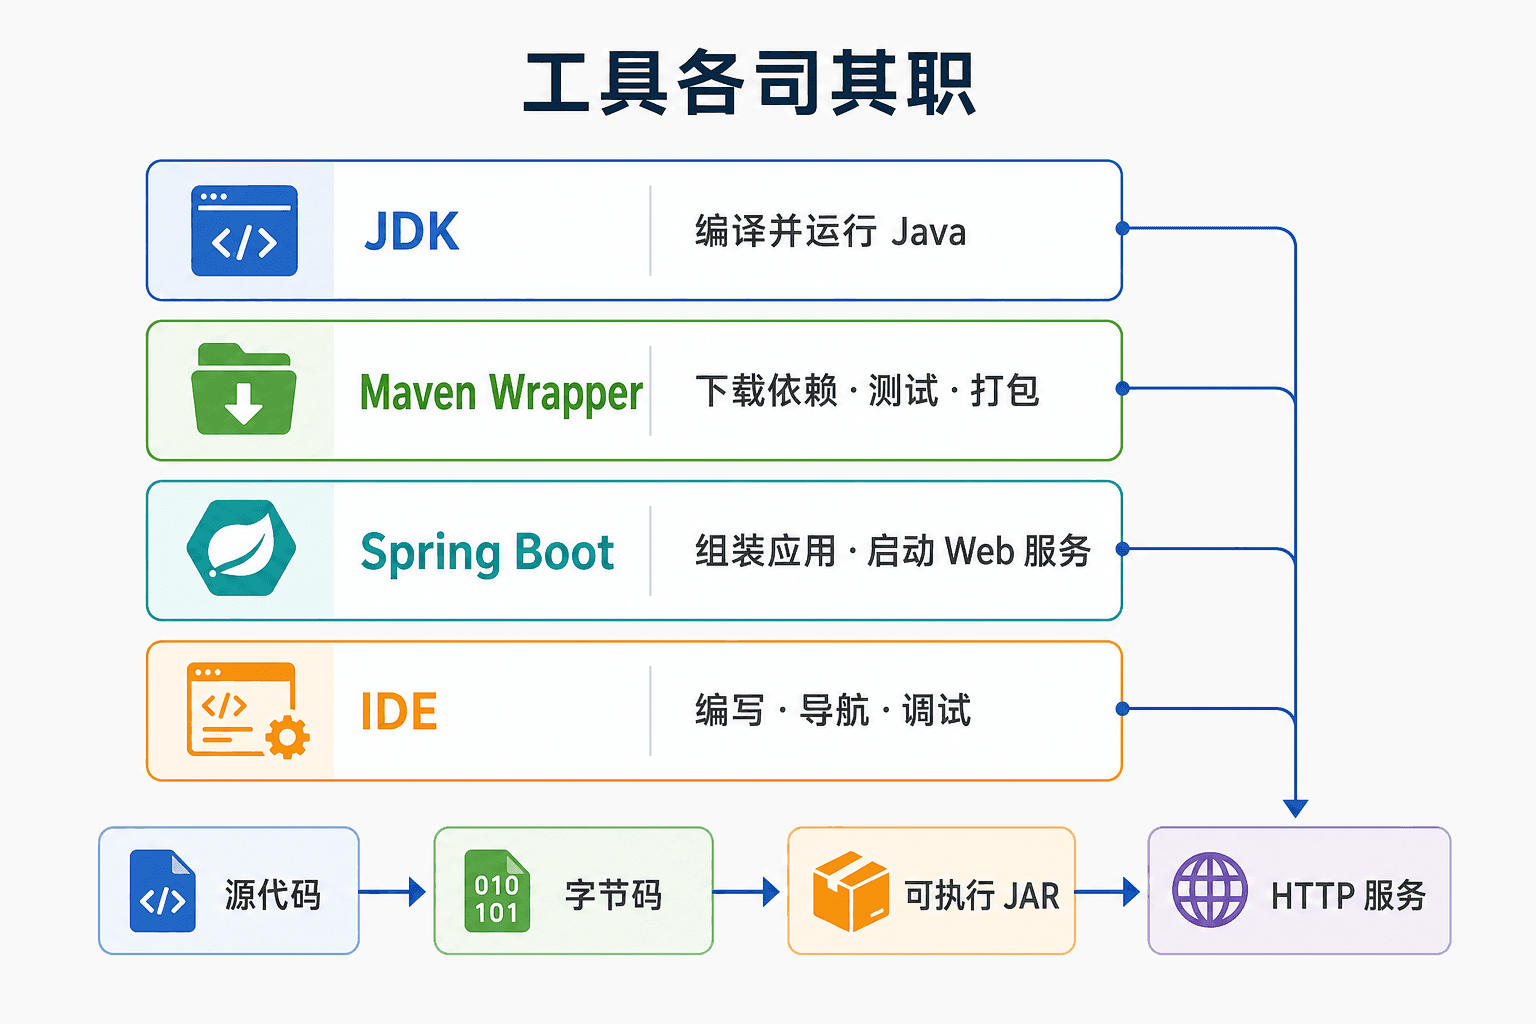
先看一个最容易混淆的问题:JDK、Maven、Spring Boot、Spring Initializr 和 IDE 到底是什么关系? 它们共同参与开发,但没有谁能完整替代另一个。
你可以把这条链路想成一次有明确分工的装配:Initializr 先给出一套起点;IDE 帮我们舒服地编辑;Maven 按项目说明书组织构建;JDK 真正编译和运行字节码;Spring Boot 在运行时创建应用上下文并启动 Web 服务。出现错误时,先判断它卡在哪一段,比照着搜索结果乱改配置有效得多。
为什么课程选 Maven
Spring Boot 同时支持 Maven 和 Gradle。这里选 Maven,不是因为 Gradle 不好,而是为了让整门课只有一套构建语言。Maven 的 pom.xml 结构比较显式,新手查看依赖、插件和构建阶段时更容易把“项目需要什么”与“命令做了什么”对应起来。后面讲测试、打包和依赖树时,我们也能一直使用同一组命令。
如果你的团队已经统一使用 Gradle,课程里的 Spring 概念照样成立,只是构建文件和命令需要换成 Gradle 的写法。不要在同一个入门项目里同时保留 pom.xml 和 build.gradle;两个构建系统都以为自己说了算,排错会变得很别扭。
IDE 选哪个并不决定项目能不能运行
IntelliJ IDEA、Eclipse 和带 Java 扩展的 VS Code 都能开发这个项目。你可以按自己的习惯选择,但要守住一个原则:命令行构建必须独立成立。同伴把代码拉下来后,不应该先导入你的 IDE 私有配置,才能勉强启动应用。
IDE 里的绿色运行按钮,本质上仍然是在选定的 JDK 上运行 TaskHubApplication.main()。当按钮能启动、终端不能启动时,通常不是 Spring Boot 偏爱 IDE,而是两边选择了不同的 JDK、工作目录或环境变量。后面的排错部分会专门处理这种情况。
导入项目时也不要把它当成“普通文件夹里的一堆 Java”。让 IDE 识别根目录的 pom.xml 并完成 Maven 同步,它才知道哪些目录是主源码、哪些是测试源码、哪些库属于类路径。依赖刚开始下载时,编辑器里的 import 可能暂时标红;先观察 Maven 同步是否完成,不要立刻把 Spring 的类复制进项目。
判断 IDE 是否正确导入,可以看三个信号:src/main/java 与 src/test/java 被识别为不同源码范围,外部库里能看到 POM 解析出的 Spring 依赖,运行配置指向 com.welearn.taskhub.TaskHubApplication。如果只是直接打开了某个深层 src 目录,包名、资源路径和工作目录都可能变得奇怪。关闭错误窗口,再从包含 POM 的根目录导入,比逐个修 IDE 标记更省事。
固定一条能复现的版本基线
搜索 Spring Boot 教程时,你会同时看到 Java 8、11、17、21、25,也会看到 Spring Boot 2、3、4 的不同写法。它们不一定都是错的,但混着复制,代码就很容易在包名、依赖名和最低 Java 版本上互相冲突。
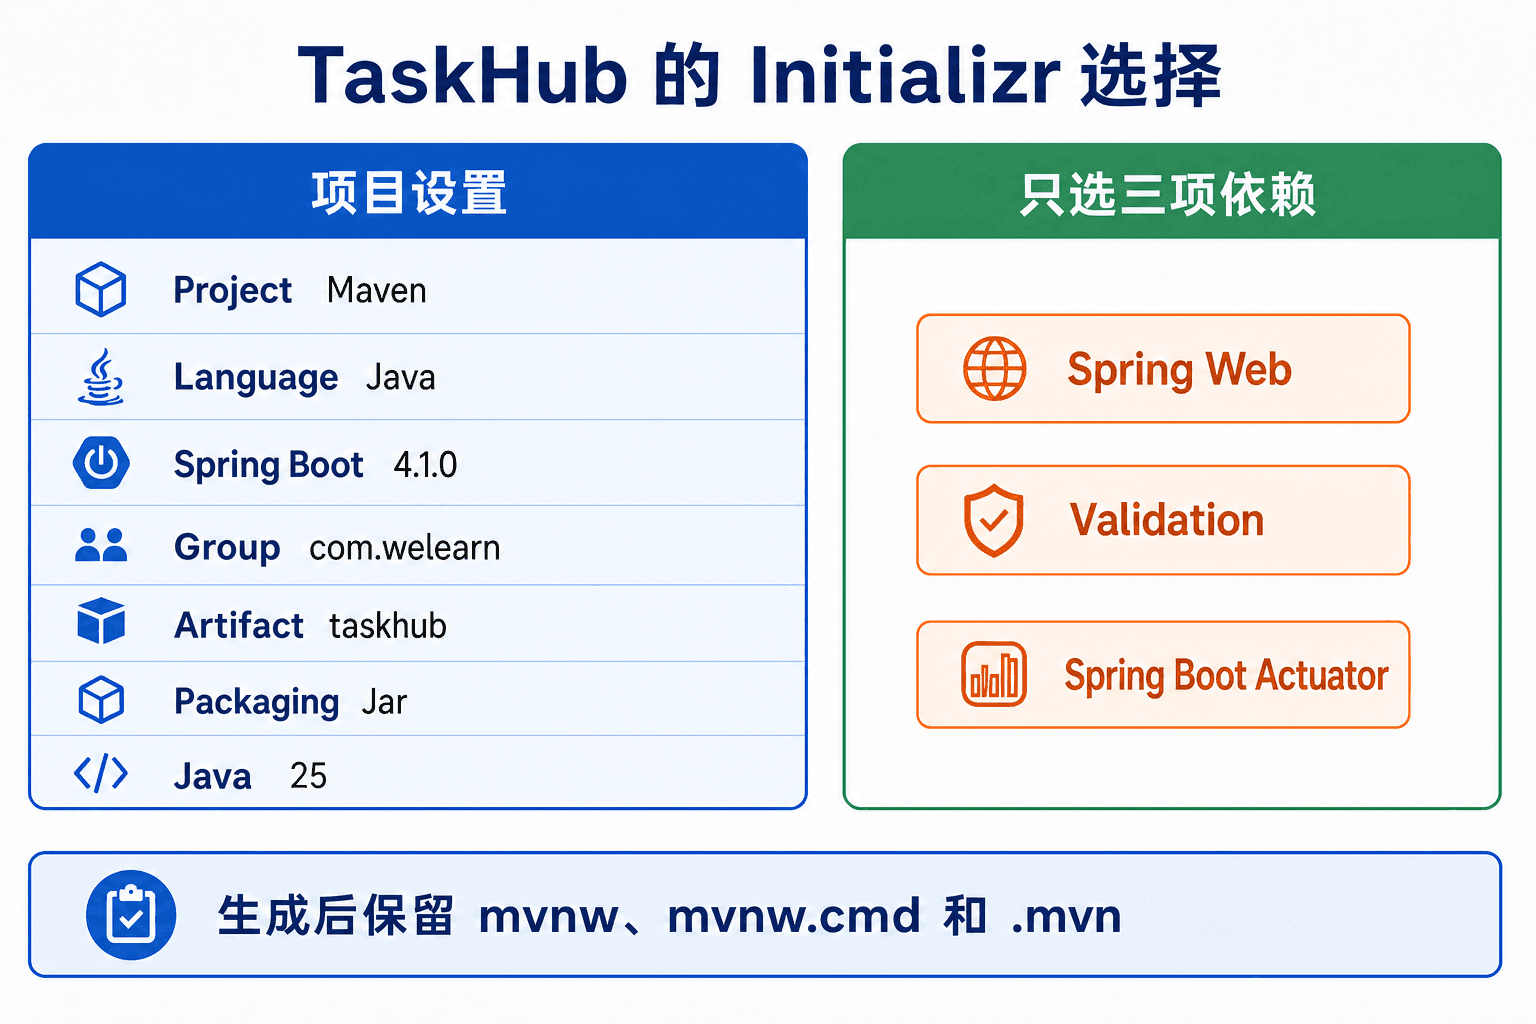
TaskHub 在整门课程中统一使用下面这组基线:
Spring Boot 4.1 至少需要 Java 17,并支持到 Java 26;我们选择其中的 JDK 25,是因为它是长期支持版本,又能与本课程使用的 Boot 版本直接配合。这里的“至少 17”不代表你可以用 JDK 17 编译一个在 pom.xml 中声明 Java 25 的项目。框架运行下限和项目编译目标是两件事,TaskHub 的所有参与者都应该使用 JDK 25。
版本选择不是数字越大越好。Java 26 在这条框架线上可以运行,但它是节奏更快的非长期支持版本;如果课程跟着每一个短周期版本移动,读者会把时间花在追环境,而不是观察 Spring 的机制。Java 21 同样是成熟的长期支持版本,不过既然 TaskHub 是从零创建的新项目,我们就把团队基线固定在 Java 25。真正进入公司项目后,版本还要结合运行平台、依赖兼容性和组织支持周期决定,不能只看个人电脑能装哪一个。
同样,Spring Boot 的“稳定版本”与 TaskHub 自己的 0.0.1-SNAPSHOT 也不是一回事。前者是框架依赖版本,我们要求它稳定可解析;后者是正在开发的应用版本,表示 TaskHub 还没有发布自己的 0.0.1 正式包。看到 SNAPSHOT 时先问它属于谁,不能因为项目版本带这个词,就误以为我们选了 Spring Boot 快照版。
先验证,再打开 IDE
JDK 安装完成后,先在一个新的终端窗口执行:
bash
java -version
javac -version
第一条检查 Java 启动器,第二条检查编译器。两条都应该显示 25 这一主版本。只有 java、没有 javac,通常意味着系统找到的是不完整的运行环境,或者 PATH 仍然指向旧位置。Spring Boot 开发需要 JDK,不只是一个能运行现成程序的运行时。
还要留意 java -version 显示的体系结构是否与电脑一致。Apple 芯片通常使用 AArch64 构建,常见 Windows 和 Linux 电脑多为 x64。装错架构未必每次都立即报错,但可能需要转译,甚至根本无法启动。
如果电脑上同时有多个 JDK,不用急着全删掉。你真正要确认的是三处选择一致:终端里的 java、Maven 实际使用的 Java、IDE 项目 SDK。项目生成后执行 ./mvnw -v,输出中的 Java version 和 Java home 会把 Maven 看到的 JDK 明确列出来。
不要只看安装器提示“安装成功”。终端命令显示的版本才是当前 shell 真正会使用的版本;IDE 也可能保存了自己的 JDK 路径。后面如果出现“明明装了 25,编译却说版本不支持”,先对照这三处,而不是先改业务代码。
用 Spring Initializr 生成 TaskHub 的起点
当然可以手写 pom.xml、目录和启动类,但入门阶段这么做没有额外收益。Spring Initializr 会根据当前 Spring Boot 版本的规则生成兼容的项目骨架,连 Maven Wrapper、忽略文件和基础测试都一起准备好。更重要的是,它生成的依赖名会随当前主版本调整,能避开许多旧教程留下来的名称差异。
在 Spring Initializr 中填写下面的选项:
版本下拉框里可能同时出现 SNAPSHOT、M 或 RC 标记。它们分别代表开发快照、里程碑和候选发布,用来提前验证新版本很有价值,但不适合作为这门入门课程的共同地基。选择无这些后缀的稳定版,团队才不容易遇到依赖今天能下、明天发生变化的情况。
有些 Initializr 客户端会给服务元数据中的内部选择标识附加“正式发布”后缀,不要把客户端参数直接抄成 Maven Parent 版本。TaskHub 的实际 pom.xml 必须使用仓库中可解析的 4.1.0。生成项目以后先打开 POM 核对真实内容,比根据下载地址或客户端内部参数猜 Maven 坐标可靠。
这些名字以后会出现在哪里
Group 通常使用反向域名风格,表达代码所属组织;Artifact 是构建产物和项目坐标的一部分,所以最终 JAR 会带上 taskhub;Package name 决定 Java 包的根位置。包名只能使用合法的 Java 标识结构,不能把项目展示名里的空格或连字符原样塞进去。
Name 是给人读的项目名,Artifact 是给构建系统使用的名称,Package name 是给 Java 类型系统和类加载使用的路径。三个字段看起来相近,但职责不同。这里把它们明确设好,后面代码就不会在生成器默认包、com.welearn 和无包声明的目录之间来回漂移。
依赖先选 Spring Web、Validation 和 Actuator。Spring Web 让应用接收 HTTP 请求,Validation 为下一节的请求参数约束准备标准能力,Actuator 则为后面观察运行状态留下入口。这一节只使用 Web 能力,另外两项会在各自需要出现时再展开。数据库和安全暂时不选,项目能力仍然随叙事逐章增长:现在先接住一次请求,下一节再围绕任务资源构建完整 REST API。
为什么不把 H2、JPA、Security、Thymeleaf 也一次勾上?因为 starter 不只是“以后也许用到”的标签。它会把一组类带进类路径,而类路径又会参与自动配置判断。比如加入数据库相关 starter 和驱动后,Spring Boot 会开始寻找数据源与持久化配置;加入安全 starter 后,请求会进入安全过滤器链。能力提前进入项目,启动日志、测试上下文和请求行为都会随之改变。按需要添加依赖,能让你看见每一次变化究竟由谁引起。
这也给团队留下了一条简单规则:POM 中的每个直接依赖都应该说得出当前用途。传递依赖由 starter 组织,业务真正不用的 starter 不要仅仅为了“显得完整”长期保留。后面新增 JPA 或 Security 时,我们会先说明问题,再增加依赖,然后观察自动配置出现了什么;这种节奏比一次生成最终大项目更适合学习和排错。
生成并解压后,确保你打开的是包含 pom.xml 和 mvnw 的 taskhub 目录。如果解压工具又套了一层同名目录,IDE 打开的层级过高,就会出现“项目里明明有文件,Maven 却找不到 POM”的错觉。
一眼看懂生成出来的目录
先别急着新建 controller、service、repository。Initializr 生成的目录不多,正好适合逐个建立概念:
text
taskhub/
├── .mvn/
│   └── wrapper/
│       └── maven-wrapper.properties
├── mvnw
├── mvnw.cmd
├── pom.xml
├── src/
│   ├── main/
│   │   ├── java/
│   │   │   └── com/welearn/taskhub/
│   │   │       └── TaskHubApplication.java
│   │   └── resources/
│   │       └── application.properties
│   └── test/
│       └── java/
│           └── com/welearn/taskhub/
│               └── TaskHubApplicationTests.java
└── target/                 # 构建后才出现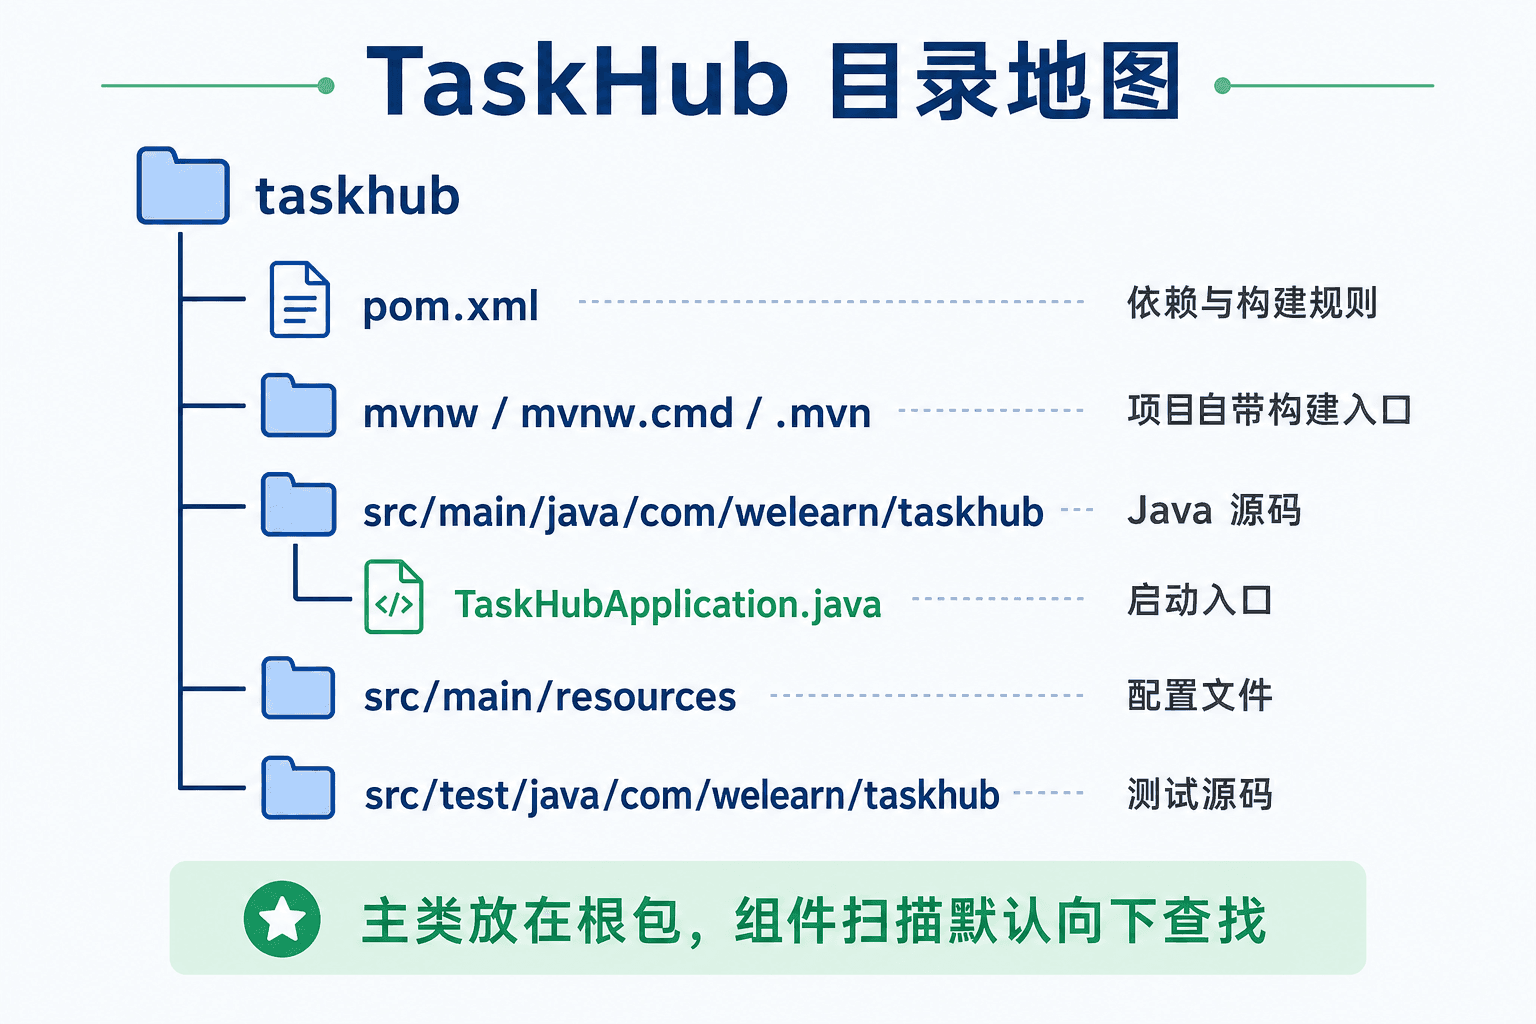
src/main/java 放会进入应用的 Java 源码;src/main/resources 放配置、模板和会进入类路径的资源;src/test/java 放测试源码。target 是 Maven 的构建输出目录,删掉后可以重新生成,不应该把它当成源码目录,也不应该手工编辑里面的 .class 文件。
.mvn、mvnw 和 mvnw.cmd 合起来组成 Maven Wrapper。它们属于项目的一部分,应当和源码一起保存。.gitignore 会忽略 target、常见 IDE 临时文件等内容,减少把本机产物提交给同伴的机会。
application.properties 此时只有很少的内容,通常能看到:
properties
spring.application.name=TaskHub它给应用上下文一个名称,日志和后续监控信息可以使用它,但不会自动创建 /TaskHub 路径,也不会改变 Java 包名。配置文件位于 src/main/resources,构建时会进入类路径;它适合保存应用默认值,不适合写入真实密码。第 5 节会系统处理环境变量、Profile 和配置优先级,这里先认识它的位置和职责。
测试目录与主目录刻意采用相同的包路径。这样测试类能自然访问适当范围的类型,也便于按生产代码位置寻找对应测试。测试源码不会打进应用的运行类路径,测试依赖也由 Maven 的 test scope 隔离。把测试临时塞进 src/main/java,即使“能跑”,也会让测试工具和辅助数据进入生产构建边界。
启动类为什么放在根包
打开 TaskHubApplication.java,你会看到:
java
package com.welearn.taskhub;

import org.springframework.boot.SpringApplication;
import org.springframework.boot.autoconfigure.SpringBootApplication;

@SpringBootApplication
public class TaskHubApplication {

    public static void main(String[]
main() 是普通 Java 程序入口,Spring Boot 没有绕过 Java 的启动规则。真正把应用带入 Spring 世界的是 SpringApplication.run():它准备环境,创建应用上下文,应用自动配置,扫描组件,并在 Web 依赖存在时启动嵌入式服务器。
@SpringBootApplication 是组合注解。你现在先记住它同时打开了配置入口、自动配置和组件扫描。组件扫描默认从启动类所在包向下寻找,所以启动类放在 com.welearn.taskhub,以后位于 com.welearn.taskhub.task、com.welearn.taskhub.config、com.welearn.taskhub.web 的组件都在扫描范围内。
如果把控制器放到平级的 com.welearn.controller,Java 编译不会因此失败,但 Spring 默认扫描不到它。浏览器最终会得到 404。这个问题看上去像“注解失效”,根因却是包边界不对。根包不是为了把目录摆得整齐,它直接定义了默认发现范围。
避免使用没有 package 声明的默认包。启动类落在默认包时,组件扫描可能尝试检查类路径里过大的范围,项目稍复杂就会出现性能和配置上的意外。使用 com.welearn.taskhub 这样的明确根包,会让扫描边界和代码归属都更清楚。
把 pom.xml 当成项目说明书
不少初学者看到 XML 就想跳过 pom.xml,只在依赖报红时复制一段进去。其实它并不是老式 Spring 的 Bean 配置,而是 Maven 的项目模型。业务对象如何创建由 Spring 管理;项目坐标、Java 版本、依赖和构建插件由 Maven 管理。这两类 XML 不能因为扩展名相同就混为一谈。
Initializr 生成的关键内容可以收拢成下面几段:
xml
<parent>
    <groupId>org.springframework.boot</groupId>
    <artifactId>spring-boot-starter-parent</artifactId>
    <version>4.1.0</version>
    <relativePath/>
</parent>

<groupId>com.welearn</groupId>
<artifactId>taskhub</
父项目 spring-boot-starter-parent 提供一组经过协调的默认版本和构建设置。正因为有这层依赖管理,spring-boot-starter-webmvc 不需要在自己的 <dependency> 中再写版本号。随便给其中某个 Spring 模块指定另一个版本,等于把一块齿轮换成不同规格,编译可能通过,运行时却可能出现方法不存在或类找不到。
Spring Web 这个选项在 Spring Boot 4 的生成结果中对应 spring-boot-starter-webmvc,测试侧则有配套的 spring-boot-starter-webmvc-test。Validation 和 Actuator 也各有主 starter 与测试 starter。很多旧文章仍然展示 spring-boot-starter-web 或统一的 spring-boot-starter-test。学习旧文章里的 MVC 概念没有问题,但不要一边使用 Boot 4 的生成器,一边为了“和文章长得一样”手工改回旧依赖名。优先查看生成后的实际 pom.xml,并让 Maven Parent 使用可取得的 4.1.0 坐标。
<scope>test</scope> 表示测试依赖只参与测试相关阶段,不会当作应用运行依赖打进最终产物。spring-boot-maven-plugin 则让 Maven 可以直接运行 Spring Boot 应用,并把普通 JAR 重新组织为可用 java -jar 启动的可执行 JAR。
如果想知道一个 starter 最终带来了哪些库,可以运行:
bash
./mvnw dependency:tree你会看到 Spring MVC、嵌入式 Tomcat、JSON 处理等传递依赖。Starter 自己往往没有多少业务代码,它更像一份经过维护的“成套物料清单”。这也是它比逐个复制依赖坐标可靠的原因。
Maven Wrapper 解决的是团队一致性
旧教程经常从“下载 Maven、解压、配置 MAVEN_HOME、修改 PATH”开始。全局安装 Maven当然可以,但 TaskHub 已经带了 Wrapper,所以它不是课程的前置条件。
macOS 和 Linux 在项目根目录执行:
bash
./mvnw -vWindows 使用:
powershell
mvnw.cmd -vWrapper 脚本会读取 .mvn/wrapper/maven-wrapper.properties,确认项目指定的 Maven 发行版。当前生成结果固定为 Maven 3.9.16。机器上没有这份 Maven 时,脚本第一次运行会下载并缓存它,以后重复执行不必每次重下。
这套机制带来一个很实际的好处:你、同伴和持续集成服务器运行的是同一版 Maven。项目不会因为某个人全局装了更老的 Maven,就在他的电脑上表现出另一套构建行为。Wrapper 文件应该纳入版本管理,不要把 mvnw 当作下载后的临时垃圾清掉。
但 Wrapper 只包住 Maven,没有包住 Java。它仍然需要先用本机 JDK 启动。若终端找不到 java,Wrapper 也不可能凭空编译 TaskHub。第一次运行还需要连接依赖仓库;公司网络使用代理或内部镜像时,应该配置 Maven 的网络与镜像设置,而不是删除 POM 里的依赖或反复改 Spring Boot 版本。
macOS 或 Linux 如果提示 Permission denied: ./mvnw,先确认当前文件确实是项目自带脚本,再恢复执行权限:
bash
chmod +x mvnw
./mvnw -v
Windows 不执行 ./mvnw,而是使用 mvnw.cmd。命令差异来自操作系统的脚本格式,不代表项目有两套 Maven 配置。
写业务代码之前先启动一次
第一次启动什么都不改。这样做能把“环境和依赖是否正确”与“我们刚写的代码是否正确”分开。如果空项目已经失败,就不该继续叠加控制器、数据库和安全配置。
进入包含 pom.xml 的目录,执行:
bash
./mvnw spring-boot:runWindows 对应:
powershell
mvnw.cmd spring-boot:run第一次运行可能会下载 Maven 本身、Spring Boot 插件和项目依赖,速度主要取决于网络和本地缓存。终端里出现很多 Downloading 不等于卡死。下载完成后,控制台会出现类似下面的关键行:
text
:: Spring Boot ::  (v4.1.0)

Tomcat initialized with port 8080 (http)
Tomcat started on port 8080 (http) with context path '/'
Started TaskHubApplication in ... seconds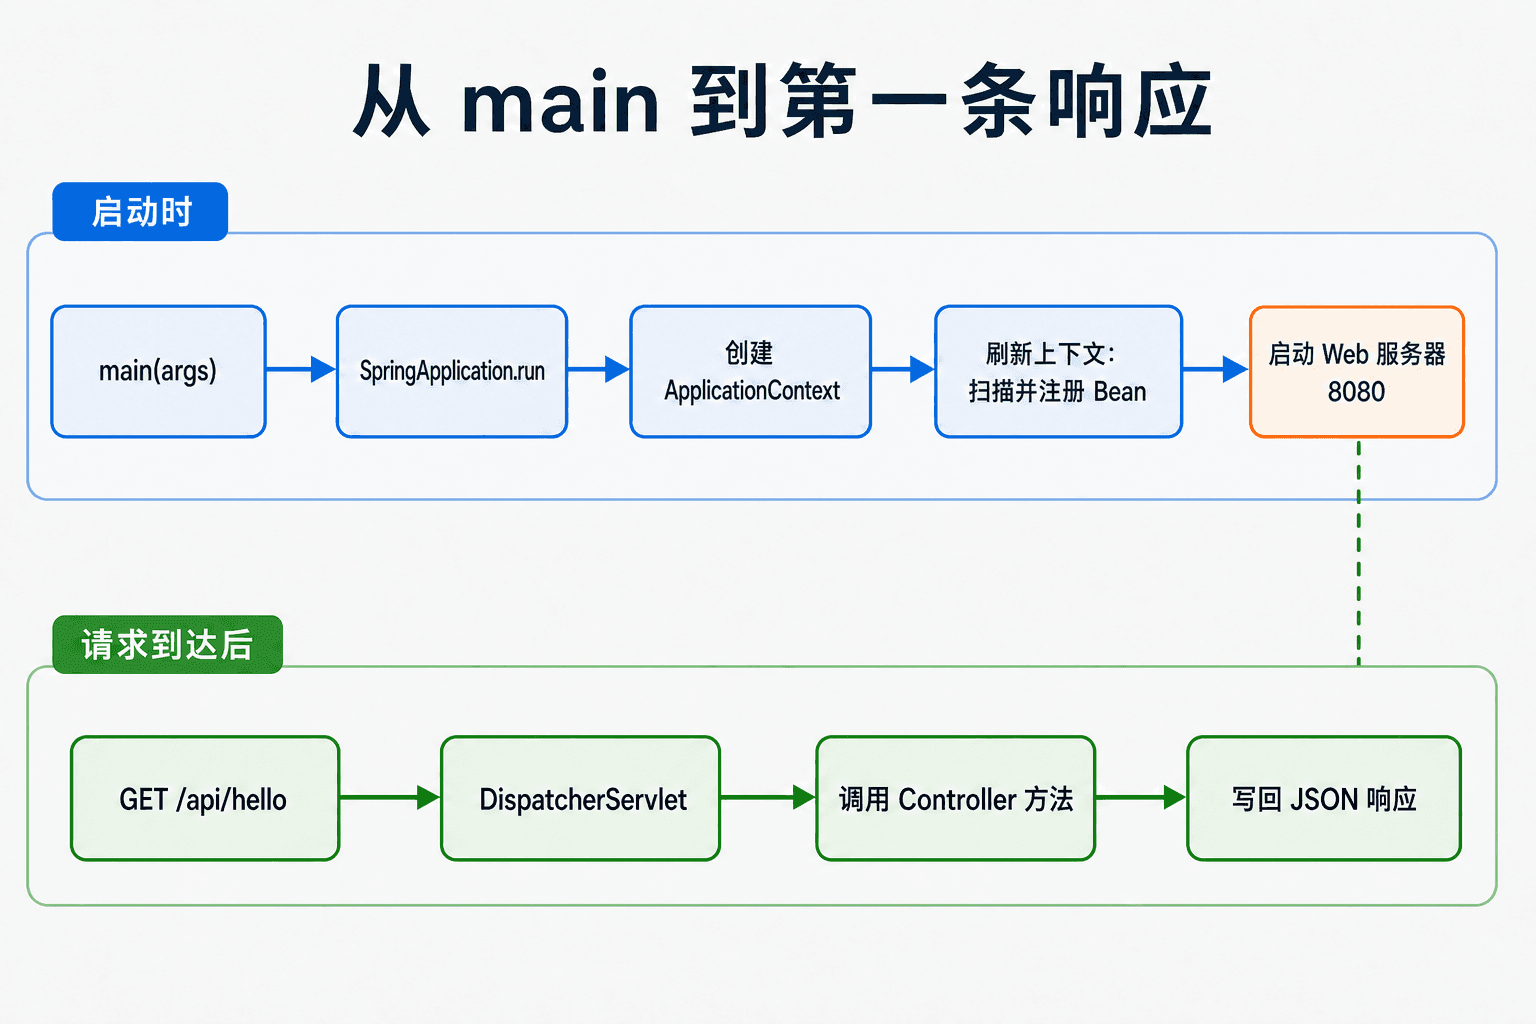
读日志时不需要一开始就理解每一行,先抓三个事实:运行的是不是预期的 Boot 版本,服务器监听的是哪个端口,最后有没有出现 Started TaskHubApplication。看到这行后,进程不会自动退出,因为服务器正在等待请求;终端一直占用是正常状态。
启动日志其实在回答不同层面的问题。Banner 旁的版本说明框架已经进入启动流程;Tomcat initialized 表示嵌入式容器正在准备端口;Tomcat started 表示容器已开始监听;最后的 Started TaskHubApplication 表示应用上下文刷新完成。若日志停在下载阶段,问题还在构建工具;若已经开始创建上下文后失败,继续向下寻找异常;若端口启动后某个请求报错,就该结合该次请求的日志排查。
阅读失败日志时,先从末尾的失败摘要和 Caused by 链中找最具体的一段,再回头看它由哪个组件触发。Java 异常会把调用过程逐层打印,最上面的一大段不一定最接近根因。也不要只截第一行发给同伴;版本、最内层原因和建议动作放在一起,别人才能复现你的判断。
此时访问根路径 http://localhost:8080/,大概率会得到 404。这个结果反而说明浏览器已经连到服务器,只是项目还没有为 / 注册处理方法。连接被拒绝表示端口上没有服务,404 表示服务接到了请求但没找到路径,两者不是同一个问题。
按 Ctrl+C 可以让正在前台运行的应用退出。改代码、重启、观察日志,是目前最清楚的节奏。自动重启工具可以以后再加;刚入门时如果代码一保存,进程就自行重启,反而容易让你看不清一次启动究竟经历了什么。
给 TaskHub 增加第一个最小接口
现在环境已经证明自己能工作,我们只加一个非常小的问候接口。它不做增删改查,不访问数据库,也不急着拆 Service 和 Repository。这个接口的目的只有一个:确认 Spring 能发现我们的控制器,HTTP 请求能映射到 Java 方法,返回对象能转换成 JSON。
在 src/main/java/com/welearn/taskhub 下新建 web 包,再创建文件:
text
src/main/java/com/welearn/taskhub/web/TaskGreetingController.java内容如下:
java
package com.welearn.taskhub.web;

import org.springframework.web.bind.annotation.GetMapping;
import org.springframework.web.bind.annotation.RestController;

@RestController
public class TaskGreetingController {

    @GetMapping
@RestController 让这个类成为 Web 控制器,并让方法返回值直接写入 HTTP 响应体。@GetMapping 把 GET 请求与指定路径绑定起来。GreetingResponse 是 Java 的 record,用很少的代码表达一份只承载数据的结果。Spring MVC 看到它以后,会使用类路径中的 JSON 转换能力,把 message 组成部分写成 JSON 字段。
注意,我们并没有写 new TaskGreetingController()。应用启动时,组件扫描发现 @RestController,Spring 把控制器创建并注册到应用上下文;随后 MVC 基础设施读取方法上的映射注解。这里第一次露出了上一节提到的 IoC 容器:控制器不是由浏览器临时创建的,而是应用启动阶段就交给容器管理。
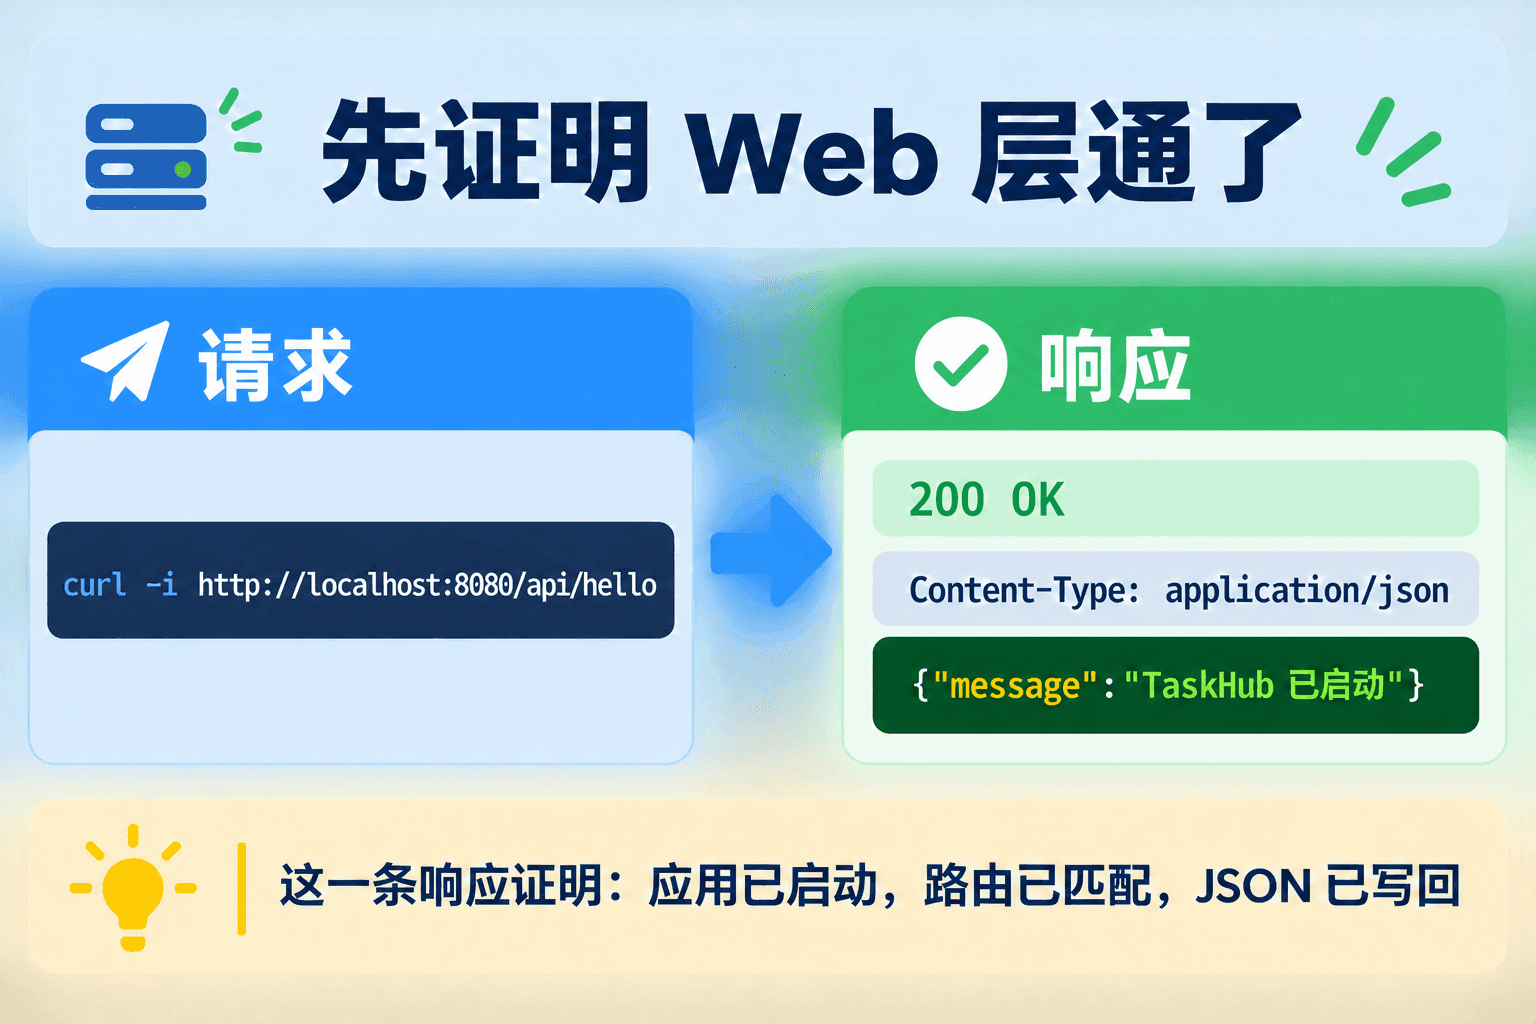
重新执行启动命令,然后在另一个终端发出请求:
bash
curl -i http://localhost:8080/api/hello响应的核心内容如下,具体的日期和部分响应头可能因机器而异:
http
HTTP/1.1 200
Content-Type: application/json

{"message":"TaskHub 已启动"}
浏览器也可以直接打开这个地址,但 curl -i 会连状态码和响应头一起展示,更适合排查接口问题。200 说明请求成功;application/json 告诉客户端响应体是 JSON;最后一行是控制器返回的问候结果。
/api/hello 只承担“Web 层已经接通”的职责。它不会冒充任务资源,也不会提前决定下一节的 DTO 和状态码。下一节会保留这副应用骨架,把一句问候升级成正式的任务 REST API,让同一个资源支持列表、详情、创建、修改和删除。
为什么这里还不建三层目录
Controller、Service、Repository 的分层是为职责边界服务的,不是创建 Spring Boot 项目时必须完成的仪式。当前问候接口没有业务规则,也没有存储动作,如果为了形式硬建一个只返回字符串的 Service,再建一个没有数据的 Repository,读者只会看到文件变多,却感受不到解耦带来的收益。
下一节会先展示“控制器既解析 HTTP,又维护任务集合,还负责校验和生成编号”会有多难改,然后再把业务规则和存储拆出去。那时 Service 与 Repository 各自解决真实问题,构造器注入也会自然出现。现在保持一个控制器,反而能把注意力集中在组件扫描、请求映射和 JSON 转换上。
这种做法并不否定分层,而是在控制抽象出现的时机:问题还不存在时不制造空壳,问题一出现就用清楚的边界解决。项目连续搭建的价值也在这里——你能看见每个目录为什么被加进来,而不是面对一个现成树形图死记职责。
把一次请求拆开看,注解就不神秘了
一个地址能返回 JSON,看起来只写了十几行代码,背后其实有一条完整链路。把它拆开以后,出错时就知道该检查哪一段。
终端先执行 Maven Wrapper。Wrapper 取得项目约定的 Maven,Maven 读取 pom.xml,准备编译所需的 JDK、依赖和 Spring Boot 插件。
JDK 把 src/main/java 下的源码编译到构建目录。随后 TaskHubApplication.main() 调用 SpringApplication.run(),应用上下文开始创建。
Spring Boot 查看类路径,发现 Spring MVC 和嵌入式 Tomcat,于是应用相应的自动配置。这里不是扫描到一个注解就凭空变出服务器,Web starter 带来的类路径条件同样参与了判断。
这个过程也解释了几个常见现象。没有 Web starter 时,应用可能创建了上下文却不启动 HTTP 服务器;控制器在扫描范围外时,服务器正常但路径是 404;返回对象无法转换时,请求已经到达方法附近,问题集中在消息转换阶段。把所有错误都叫作“Spring 配置不对”,会失去这些有用的定位信息。
测试、打包和运行的是同一份项目
IDE 能启动只是第一步。一个可靠项目还应该能从根目录完成测试与打包。先停止正在运行的应用,再执行:
bash
./mvnw testInitializr 已生成一个 contextLoads() 测试。它暂时没有业务断言,价值是验证 Spring 应用上下文能否创建。看到 BUILD SUCCESS,说明测试阶段通过。下一节开始,我们会给接口补上真正的行为测试,而不是永远停留在“能启动”。
接着打包:
bash
./mvnw clean packageclean 删除旧的 target,避免上一次构建产物混进来;package 会经过编译和测试,再生成:
text
target/taskhub-0.0.1-SNAPSHOT.jarMaven 的构建阶段有固定顺序。执行 package 时,不是只做最后一步压缩,它会先处理资源、编译主源码、编译测试、运行测试,再进入打包阶段。任何前置阶段失败,JAR 都不应该被当作本次可靠产物。控制台末尾的 BUILD SUCCESS 因此比“target 里碰巧还留着一个旧 JAR”更可信。
这也是前面建议使用 clean package 的原因:学习和发布验证时,我们希望结果完全来自当前源码。日常快速迭代不必每次都 clean,Maven 可以利用增量结果节省时间;但遇到“我明明删了一个类,运行时为什么还看得到”这类幽灵问题时,清理构建目录能帮助排除陈旧产物。
运行它:
bash
java -jar target/taskhub-0.0.1-SNAPSHOT.jar然后再次请求 /api/hello,会得到同样的 JSON。spring-boot:run 适合开发阶段直接从项目运行,java -jar 验证的是打包产物。两种入口不同,但最终启动的是同一个 TaskHub 应用。
这个 JAR 不只装着我们编译出的类,还按 Spring Boot 的可执行归档结构带上运行需要的依赖和启动加载器。部署时不必先把一个 WAR 复制到外置 Tomcat 的某个目录,也不需要手工拼接几十个 JAR 的类路径。目标机器仍然需要合适的 Java,但应用服务器已经是项目依赖的一部分。
到这里,TaskHub 已形成最小闭环:源码可以编译,应用上下文可以测试,项目可以打包,JAR 可以启动,HTTP 请求可以得到 JSON。后面增加数据库或安全配置时,只要这条闭环持续通过,我们就能更快判断是哪次改动引入了问题。
常见故障不要靠重装解决
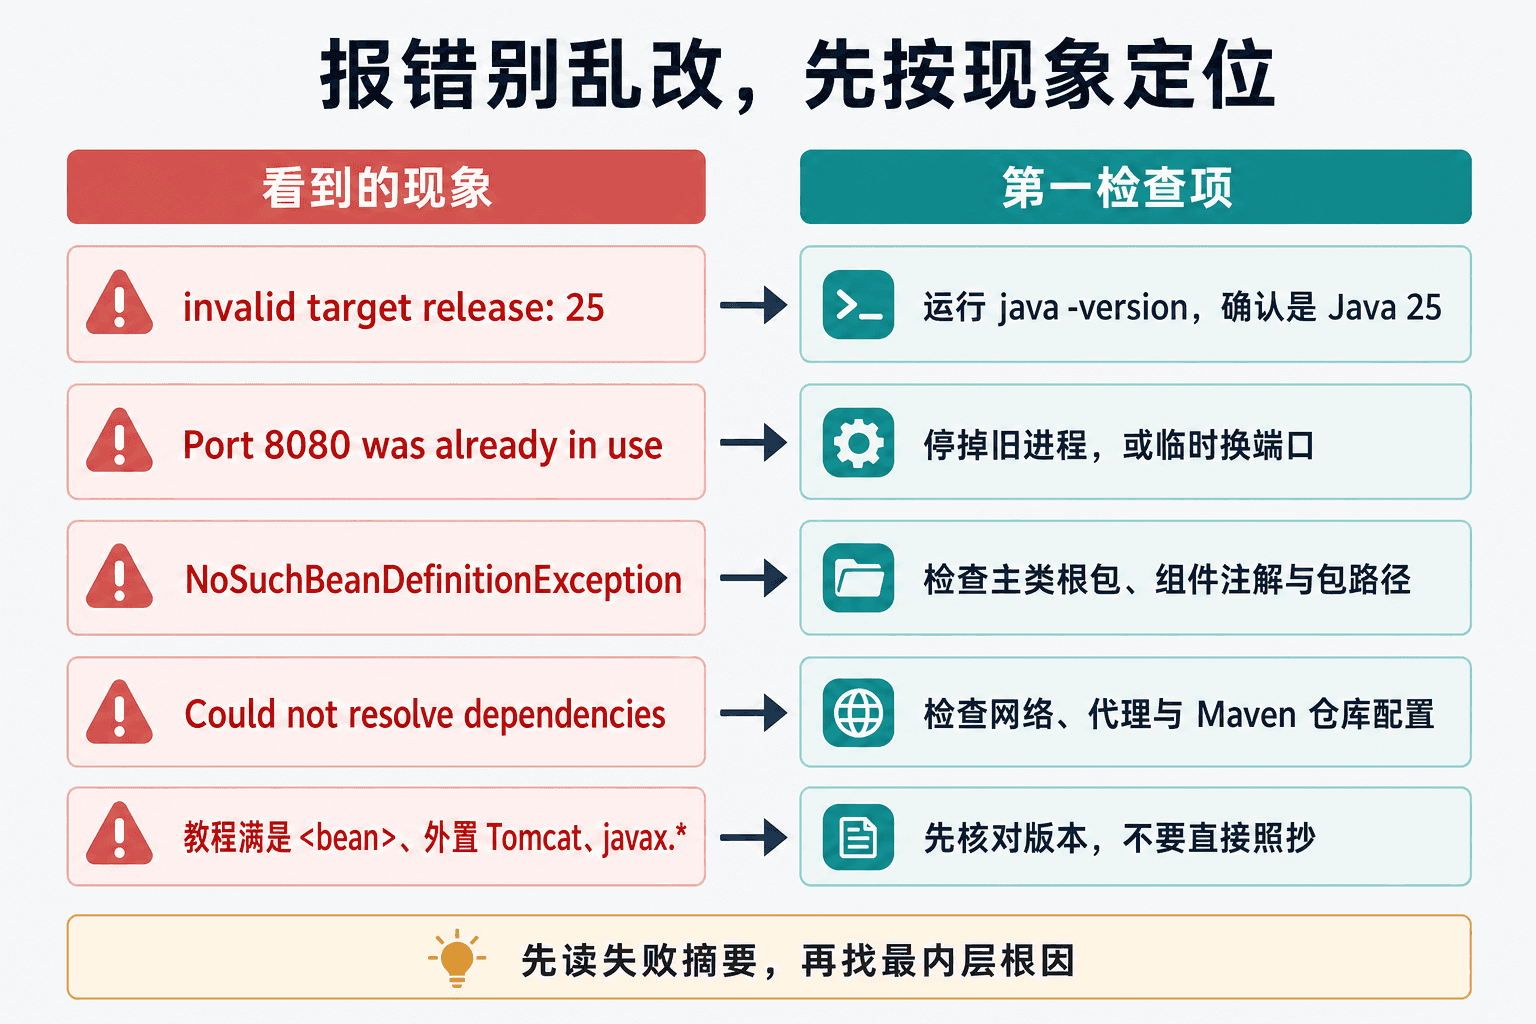
环境问题最让人烦的地方,是错误经常出现在一处,根因却在另一处。下面按“看到什么”来排查,而不是给出一串不分场景的命令。
终端说找不到 java 或 javac
先回到 JDK 层。重新打开终端,检查:
bash
java -version
javac -version
如果命令不存在,说明 PATH 没有指向 JDK 的 bin 目录;如果 JAVA_HOME 被使用,它应该指向 JDK 根目录,而不是指向 bin/java 这个可执行文件。修好后再执行 ./mvnw -v,确认 Maven 显示的 Java 也是 25。
出现 release version 25 not supported
这通常表示 Maven 实际使用的编译器比项目声明的 Java 25 更旧。不要把 <java.version> 随手改成电脑碰巧拥有的版本,这会让你的项目与课程和同伴产生新的差异。应该让终端、Maven 和 IDE 项目 SDK 都切换到 JDK 25。
出现 UnsupportedClassVersionError
这类错误通常发生在“用较新的 JDK 编译,却用较旧的 Java 运行”。例如 JAR 是按 Java 25 生成,启动命令却落到了旧运行时。分别检查构建时 ./mvnw -v 和运行时 java -version,不要只检查其中一个。
Maven 一直下载失败
先看错误属于超时、域名解析、证书、代理认证,还是仓库返回找不到构件。如果整个依赖仓库都无法连接,修改控制器没有任何作用。在受管网络中,通常需要使用组织提供的 Maven 镜像或代理设置。恢复网络后重复原命令即可,Maven 会复用已经完整下载的缓存。
不要从不明位置手工下载一堆 JAR 丢进项目,也不要因为某个依赖暂时没下到,就随机改成旧教程里的版本。那样会绕过 Maven 的依赖管理,让后续构建无法复现。
当前目录没有 POM
若看到“找不到项目”或“没有 POM”,执行目录检查:
bash
pwd
ls
Windows 可以用 cd 和 dir。当前目录里应该直接看到 pom.xml、mvnw 和 src。如果只看到一个 taskhub 子目录,就先进入它。Maven 不会猜你的项目藏在哪一层。
8080 端口已被占用
Spring Boot 会明确提示嵌入式服务器无法启动,因为 8080 已被使用。最稳妥的做法是先找到并停止你之前启动却忘记关闭的 TaskHub。macOS 和 Linux 可以查看:
bash
lsof -i :8080Windows 可以查看:
powershell
netstat -ano | findstr :8080如果另一个服务确实需要占用 8080,可以临时换端口:
bash
./mvnw spring-boot:run -Dspring-boot.run.arguments=--server.port=8081或者给打包后的 JAR 传入:
bash
java -jar target/taskhub-0.0.1-SNAPSHOT.jar --server.port=8081换端口后,请求地址也必须改成 http://localhost:8081/api/hello。只改启动端口、不改客户端地址,会让你误以为接口消失了。
应用已启动,但接口是 404
先确认请求方法和路径完全一致:这里是 GET /api/hello。然后检查控制器是否有 @RestController,方法是否有 @GetMapping,文件是否位于 com.welearn.taskhub 的子包,启动的是否是刚刚修改的那个项目。
根路径 / 返回 404 不代表问候接口也有问题。分别请求精确地址。很多排错时间都浪费在“浏览器默认打开根路径,但代码只声明了 /api/hello”上。
浏览器显示连接被拒绝
连接被拒绝比 404 更早:目标端口没有进程在监听。回到运行应用的终端,检查它是否仍在工作,是否因启动异常退出,实际端口是否被改过。不要在服务器尚未启动时研究控制器映射。
IDE 能运行,终端却失败
对比 IDE 的 Project SDK、Maven Runner JDK 和终端 ./mvnw -v。再检查 IDE 的运行配置是否偷偷加入了端口、环境变量或配置文件。短期内把这些条件明确写出来,长期才能让团队复现;依赖某个本机运行配置,换电脑后问题还会回来。
想看到更多自动配置判断
当普通错误信息还不足以解释启动失败时,可以打开调试条件报告:
bash
java -jar target/taskhub-0.0.1-SNAPSHOT.jar --debug它会列出哪些自动配置条件匹配、哪些没有匹配。报告很长,不适合遇到任何错误都先开,但在“为什么某个自动配置没有生效”这类问题上很有价值。先读失败信息最末尾的描述和行动建议,再决定是否需要更完整的报告。
识别旧教程,别把历史写法拼进新项目
Spring 生态时间很长,搜索结果里混着不同年代的项目。旧资料中的设计思想可能仍然有价值,但启动方式和具体配置不一定适用于 Spring Boot 4。
看到大量 <bean> 和 web.xml
那通常是在讲传统 Spring XML 配置或更早的 Servlet 部署方式。现代 Spring Boot 项目可以使用 Java 配置、注解和自动配置,不需要为了声明一个 REST 控制器先写 web.xml。pom.xml 仍然是 XML,但它管理的是 Maven 构建,不是把每个业务对象都登记成 Spring Bean。
教程要求先安装外置 Tomcat 再部署 WAR
这是合法的部署方案,却不是 TaskHub 的默认路线。我们选择 Jar,Web starter 带来嵌入式 Tomcat,main() 可以直接启动服务器。先学清楚这种独立运行模型,未来真的遇到传统应用服务器时,再把 WAR 部署当作一种有约束的选择,而不是写 Java Web 的必经仪式。
示例停留在 Java 8、Boot 2 或 javax.*
不要只改一处版本号就期待整篇代码自动升级。较新的 Spring 世代使用 Jakarta 命名空间,Boot 4 还进一步调整了模块和 starter 的组织。复制前先确认文章对应的 Boot 主版本,再把概念翻译到当前依赖,而不是混用包名。
示例使用旧 starter 名称
TaskHub 由当前 Initializr 生成,Spring Web 对应 spring-boot-starter-webmvc,测试依赖也有配套 starter。旧项目的 spring-boot-starter-web 并不意味着旧项目毫无价值,只表示依赖组织属于另一条版本线。学习控制器、请求映射和依赖注入的思想时可以参考,落到 POM 时以当前版本为准。
示例让你选择 Snapshot
快照版是持续变化的开发产物,适合框架验证和提前兼容,不适合初学者排除环境变量。课程使用稳定版,是为了让报错更可能来自我们自己的改动,而不是远端构件变化。
最危险的不是“旧教程”三个字,而是把三个年代的片段拼在一起:用 Boot 4 的父项目、Boot 2 的依赖名、Java 8 的代码和外置 Tomcat 的部署说明。每一段单独看都像真的,组合起来却没有一套版本为它负责。
判断一段资料能否落进 TaskHub,可以先做一轮小对账:它使用的 Spring Boot 主版本是否相同,最低 Java 是否兼容,依赖名在当前 POM 中是否存在,代码 import 是否属于当前命名空间,部署模型是否仍是可执行 JAR。概念能对上、具体写法对不上时,保留它解释问题的思路,再用本项目版本重写代码。这样既不会因为资料旧就全盘丢弃,也不会让历史配置悄悄混进新项目。
复制错误信息去搜索时,也应带上稳定而有辨识度的部分,例如异常类型、相关 starter 和 Boot 主版本;进程号、本机目录、某次下载速度通常没有帮助。先把问题缩到明确的一层,排查才不会越走越远。搜索结果回到项目后仍要经过 POM、编译和测试验证。能在 TaskHub 当前版本上重复通过,才算真正解决,而不是“网页上有人说可以”。
离开这一节前做一次闭环检查
现在请从项目根目录按顺序完成下面几件事。它们不是为了背命令,而是在确认同一份项目从源码到响应没有断点。
bash
java -version
./mvnw -v
./mvnw test
./mvnw clean package
java -jar target/taskhub-0.0.1-SNAPSHOT.jar
在另一个终端执行:
bash
curl -i http://localhost:8080/api/hello你应该能确认:Java 和 Maven 使用 JDK 25;测试通过;打包生成可执行 JAR;应用监听 8080;问候接口返回状态码 200 和 JSON。完成后用 Ctrl+C 停止进程。
项目目录里应该保留 mvnw、mvnw.cmd 和 .mvn,这些是可复现构建的一部分;target 随时可以重新生成,不需要手工维护。不要把 JDK、Maven 安装包或依赖 JAR 复制进源码目录。项目描述的是依赖与版本,构建工具负责取得它们。
下面几道题用来检查你是否真的分清了工具和启动链路。
1
TaskHub 已带 Maven Wrapper,新同伴构建项目前仍然必须准备什么?
2
应用日志显示 Started TaskHubApplication,但访问根路径得到 404,最合理的判断是什么?
3
控制器编译成功却始终返回 404,并且它位于 com.welearn.controller,最先应该检查什么?
4
pom.xml 是 Maven 构建模型,因此它和旧式 Spring XML Bean 配置承担相同职责。
下一步把一次 GET 扩成一组 REST 操作
这一节没有堆很多业务代码,却把后面最容易反复绊倒的问题先理顺了。现在你知道 JDK 负责什么、Maven 为什么通过 Wrapper 进入项目、Initializr 生成了哪些约定,也能从 main()、组件扫描和自动配置一路追到 8080 端口。
更重要的是,TaskHub 已经不再是一个空目录。/api/hello 证明客户端可以通过 HTTP 取得 JSON。不过这仍然只是一句固定问候:它不能接收新任务,不能按 ID 查询,不能修改状态,也没有清晰表达任务接口的 HTTP 状态码与错误。
下一节我们会沿着同一条项目线,把这个问候接口扩成正式的任务 REST API。届时会引入任务模型、请求与响应的边界,并让 GET、POST、PUT、DELETE 各自承担清楚的语义。你刚刚建立的启动和请求链路不会被推翻,它会成为每一次新增能力都要经过的底座。